
4/30/2020
4/29/2020


1/24/2020
VERDIGRIS BUCKET
Decorating Containers

Materials
Galvanized bucket
Medium grade sandpaper
Metal primer
Small decorating brush
Gold paint
Amber shellac
Artist's acrylic paint in white and aqua-green
Water for mixing
Natural Sponge
Polyurethane matt varnish
Instructions
1.- Sand the bucket, then prime with metal prime. (2-3 hours dry). Paint with gold paint (dry 2-3 hours.
2.- Paint with amber shellac and dry for 30 minutes. Mix white acrylic paint with aqua-green with water.
3.- Sponge on the verdigris paint and dry for 1-2 hours. Apply a coat of varnish
5/02/2019


4/29/2019


4/25/2019
4/18/2019


4/17/2019
Cardigan crochet pattern

What do you think? https://pin.it/zemnp4yxtok7sa

Size Medium/Large (36-38'', 92-97 cm in bust circumference) .
Size 5 cotton thread, 49.6 г - 210 м, 1.75 oz - 230 yards, crochet hook 2 mm.
Gauge - square motif side is 16 cm.
Bottom (squares):
Make 6 squares wide and 4 squares high (upper left and upper right squares are partial.)
Gauge - square motif side is 16 cm.
Bottom (squares):
Make 6 squares wide and 4 squares high (upper left and upper right squares are partial.)
Connecting squares:
Connect squares as you go by p, but not by ch-12 sp at the corners.
Connect squares as you go by p, but not by ch-12 sp at the corners.
Only when you have 3 squares,connected by p, make 4th square and make connection where 4 corners meet (instead of ch-12): ch 6, insert hook in 3 ch-12 sps of other 3 squares (counting them counterclockwise), yarn over (yo), draw yarn through 3 ch-12 spaces, [yo, draw yarn through 1 loop on hook] twice, ch 5.
Each front part is 1 3/4 squares wide, the rest is back.
Upper part of vest: crochet up from the bottom.
ROW 1 :
front: 62 dc, back 121 dc, front 62 dc = 245 st
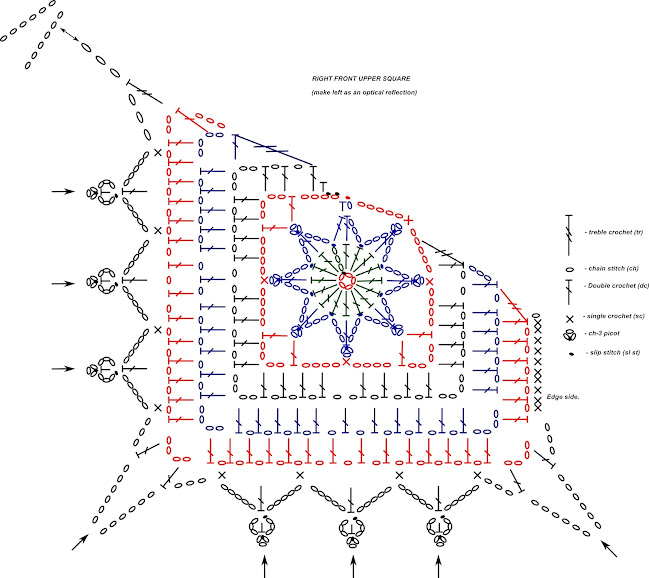
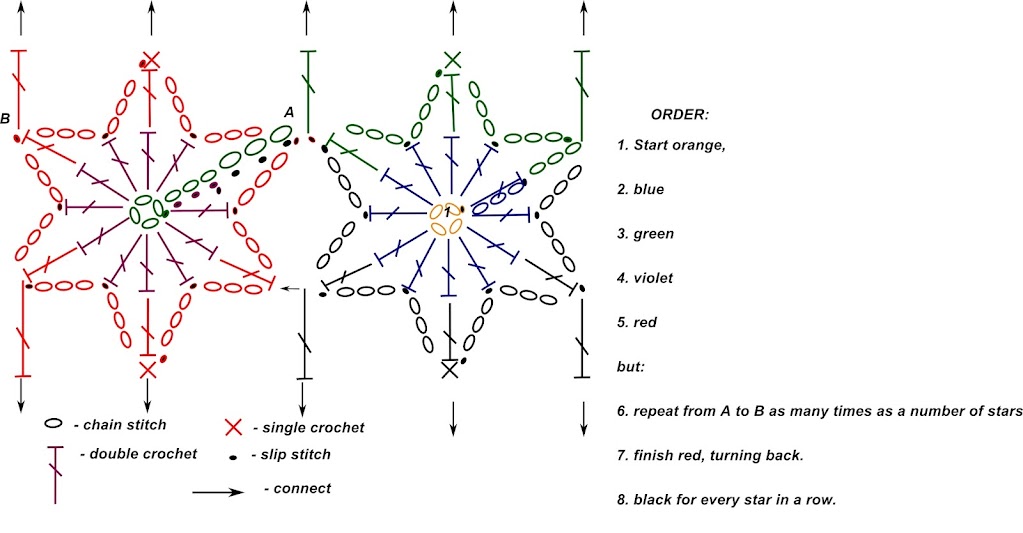
ROW 2 (stars):
Right front part: work on 62 stitches.
Right front part: work on 62 stitches.
5 stars for each side (1 partial) , 10 stars for the back = 20 stars
Start from the armpit.
Connect in every 6th dc.
The last star is missing one beam, to decrease. Connect 3rd beam of this last star by tr to the last dc.
ROW 3: Ch 5, instead of every 6th ch make 1 dc and connect 2 beams of neighboring stars at the same time = (55 stitches above 5 stars) plus ch 12 for a sleeve.
The last star is missing one beam, to decrease. Connect 3rd beam of this last star by tr to the last dc.
ROW 3: Ch 5, instead of every 6th ch make 1 dc and connect 2 beams of neighboring stars at the same time = (55 stitches above 5 stars) plus ch 12 for a sleeve.
ROW 4: 67 dc
ROW 5: net: ch 5, sc in every 4th dc, except first sp (connect first sp in 2nd dc - to make smooth decrease) = 17 spaces.
ROW 6: ch-5 net, decrease 1/2 of ch-5 sp
ROW 7: ch-5 net, decrease 1/2 of ch-5 sp
ROW 8: dcs
ROW 5: net: ch 5, sc in every 4th dc, except first sp (connect first sp in 2nd dc - to make smooth decrease) = 17 spaces.
ROW 6: ch-5 net, decrease 1/2 of ch-5 sp
ROW 7: ch-5 net, decrease 1/2 of ch-5 sp
ROW 8: dcs
ROW 9: 5 stars, connect last one at the neck line in 8th dc from the edge by tr.
ROW 10: ch sts
ROW 11: dcs
ROW 12: net, 1st ch-5 sp at the neck line in 3rd dc from the edge, the rest in every 4th.
ROW 13: ch-5 net, do not decrease
ROW 14: ch-5 net, do not decrease.
ROW 15: dcs
ROW 15: stars
ROW 16: dcs = 62
ROW 17: ch-5 net
ROW 18: ch-5 net 2/3 ( to make smooth shoulder)
ROW 19: ch-5 net 1/3
Left front part: the same as right.
Back:
121 dc.
Make 10 stars in first row,
Row 2: add ch 12 to every side (sleeves) = ch 145 (121 + 12+ 12) (connect with all stars while doing this row by dc instead of every 6th stitch)
Row 3: 145 dc . We need 61 dc for every shoulder + 46 for the neck hole = 170 dc. So, increase 25 sts from 4th to 16th rows at some points.
ROWS 4,5,6 - ch-5 net
ROW 7: dcs
ROW 8: 13 stars
ROW 9: ch sts
ROW 10: dcs
ROWS 11,12,13: ch-5 net
ROW 14: dcs
ROW 15: 14 stars
ROW 17: ch-5 net, connect with front shoulders while crocheting (I connected 5 arcs)
ROW 18: ch-5 net, connect with front next 5 arcs from the edge.
ROW 19: ch-5 net, connect the rest of shoulders.
Connect sleeves at the armpit by making a net somehow :)
Then make the edge around all edges of the vest. (I made *5 dc in one stitch, skip 3 ch sts, sc, sc, skip 3 ch*, repeat from * to *
4/15/2019


4/11/2019

4/09/2019
Crochet Bhuo
What do you think? https://pin.it/prbejkkyv64exi
Spanish Pattern

Spanish Pattern
nomenclatura:
pb= punto bajo o medio punto
aum= aumento
dim= disminución
pb= punto bajo o medio punto
aum= aumento
dim= disminución
Parche del ojo (x2):
Tejer en celeste
1: 6 pb en un anillo magico
2: 6 aum (12)
3: *1pb, 1 aum* repetir (18)
4: *2pb, 1 aum* repetir (24)
5: *3pb, 1 aum* repetir (30)
Cortar dos círculos iguales en fieltro Blanco más
pequeños que los circulos que acabamos de tejer. Bordar un ojo en negro como si
estuviera cerrado y pegar un botoncito en el otro.
Cuerpo:
Empezar con azul oscuro
1: 6 pb en un anillo magico
2: 6 aum (12)
3: *1pb, 1 aum* repetir (18)
4: *2pb, 1 aum* repetir (24)
5: *3pb, 1 aum* repetir (30)
6: *4pb, 1 aum* repetir (36)
7: *5pb, 1 aum* repetir (42)
8: *6pb, 1 aum* repetir (48)
9: *7pb, 1 aum* repetir (54)
10-17: 54 pb (54)
18: *7pb, 1 dim* repetir (48) a partir de aqui tejer
celeste
19-21: 48 pb (48)
22: *6pb, 1 dim* (42)
23-27: 42 pb (42)
28: *5pb, 1 dim* repetir (36)
29: 36pb (36)
30: *4pb, 1dim* repetir (30)
31-32: 30pb (30) llenar el
buho
33: *3pb; 1dim* repetir (24)
34: *2pb, 1dim* repetir (18)
35: *1pb, 1dim* repetir (12)
Pico:
Tejer en naranja
1: 4 pb en un anillo magico
2: *1pb, 1aum* repetir (6)
3: *2pb, 1aum* repetir (8)
4: *3pb, 1aum* repetir (10)
Orejas: (x2)
Tejer en azul oscuro
1: 6 pb en un anillo magico
2: *2pb, 1aum* repetir (8)
3: *3pb, 1aum* repetir (10)
4: *4pb, 1aum* repetir (12)
5: *1pb, 1aum* repetir (18)
6: 18pb (18)
7: aplastar el cono de la oreja y unirla com 9 pb.
Alas: (x2)
Tejer en azul oscuro
1: 6 pb en un anillo magico
2: 6 aum (12)
3: *1pb, 1 aum* repetir (18)
4: *2pb, 1 aum* repetir (24)
5: *3pb, 1 aum* repetir (30)
6: *4pb, 1 aum* repetir (36)
7: *5pb, 1 aum* repetir (42)
8:
Tejer 1 pb en el primer punto
Tejer 1 vareta en el segundo punto
Tejer 2 varetas dobles en el tercer punto
Tejer 1 vareta doble, 1 vareta triple, 1 vareta doble
en el 4 punto
Tejer 2 varetas dobles en el quinto punt
Tejer 1 vareta en el sexto punto
Tejer 1 pb en el septimo punto
Cola:
1° parte (x2)
Tejer en azul oscuro
1: 6 pb en un anillo magico
2: 6 aum (12)
3-5: 12pb (12)
6: *2pb, 1 dim* repetir (9)
2° parte
7: Unir las dos partes com una vuelta completa de pb
(18)
8: 18pb (18)
9: *4pb, 1dim* repetir (15)
10: 15pb (15)
11: *3pb, 1dim* repetir (12)
12-13: 12pb (12)
14: 6 dim (6)
Patas: (x2)
Tejer en naranja
1: 6 pb en un anillo magico
2: 6 aum (12)
3-4: 12pb (12)
5: *2pb, 1dim* repetir (9)
6-8: 9pb (9)
Terminación:
Luego de unir todas las piezas bordar las cruces,
comenzas en la fila 21 y finalizar en la fila 31.
El búho ya está listo
12/04/2018

Subscribe to:
Comments (Atom)